Views: 0 Author: Site Editor Publish Time: 2026-09-04 Origin: Site


You return from a rough outing and spot a crack in your fiberglass boat. Your heart sinks. You imagine the repair bill. But you can handle this yourself. With clear guidance, you will fix the damage and save money. This guide walks you through each stage, from assessment to final polish. Patience and precision matter most. Using high-quality materials, like those from trusted manufacturers such as YAMANE RYU YACHT, strengthens your repair. You gain practical skills and confidence. You take control of the project. Your boat will look great again, and you will feel proud of your work.
Use a tapping test to check the damage and find hidden delamination.
Remove all cracked fiberglass and bevel the edges at a 12 to 1 ratio.
After sanding, wipe the surface with isopropyl alcohol so the next layer sticks well.
Use proper backing and layered fiberglass patches for large holes.
Put on the gelcoat in thin layers, and use a surfacing agent so it dries without being sticky.
Before polishing, sand the surface while it is wet. Start with 600-grit sandpaper, then move to finer grits, all the way up to 2000.
Pick marine-grade materials from reliable manufacturers so your repairs last a long time.
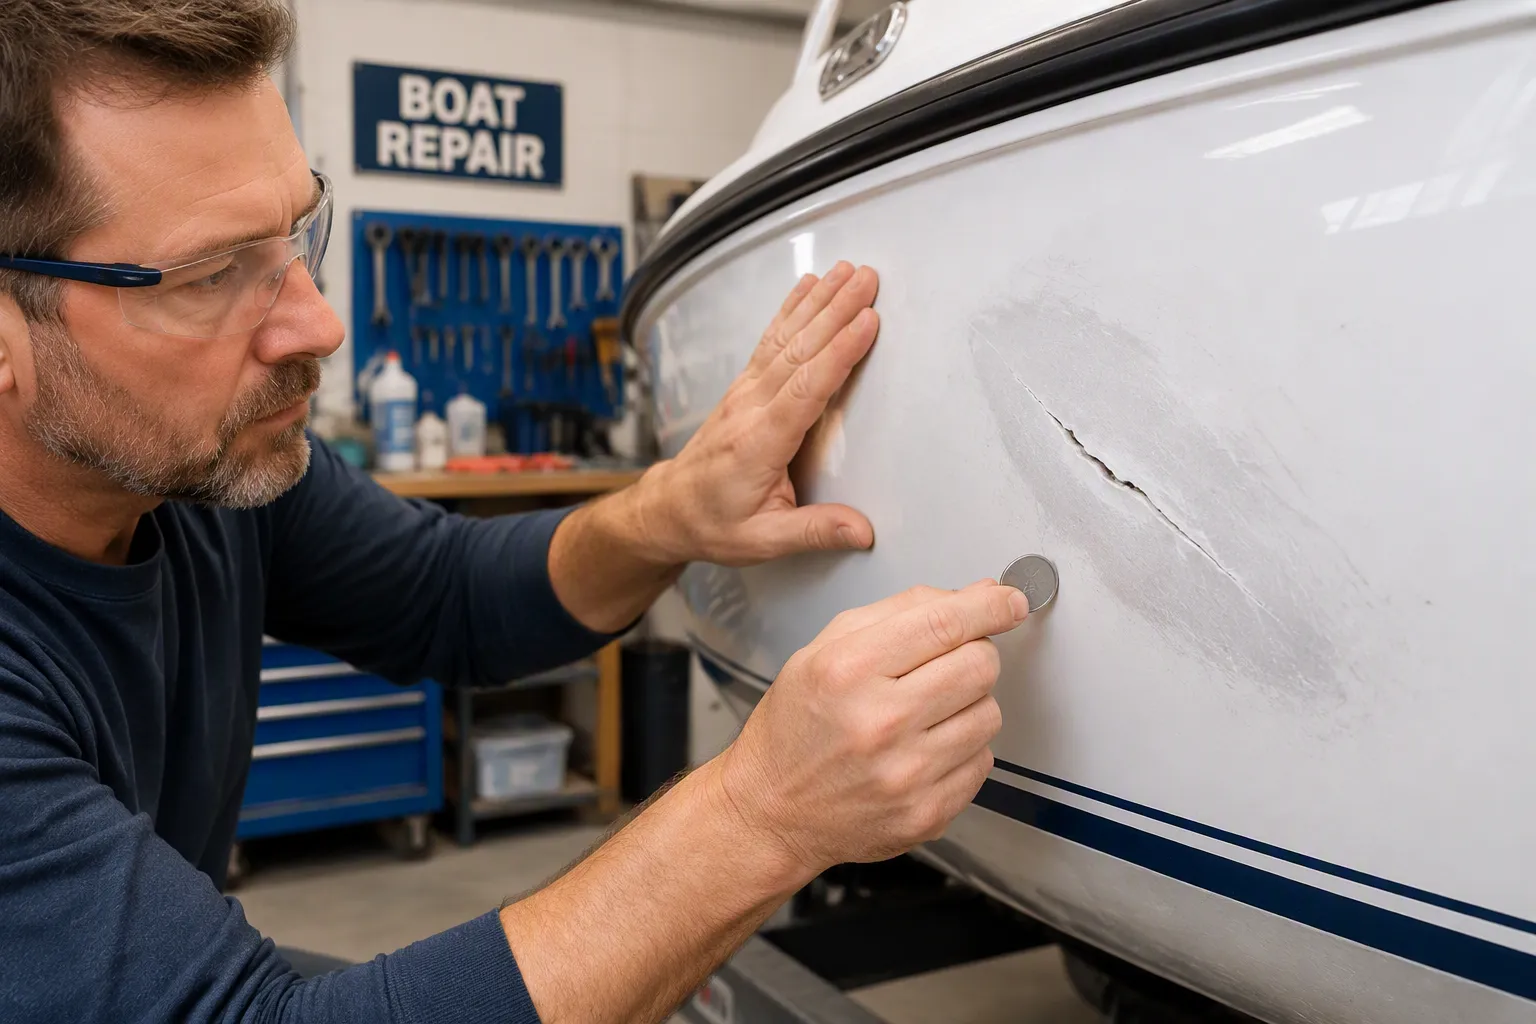
Before you mix any resin, you must understand what you are fixing. A proper assessment saves time and prevents future failure. You need to know whether the damage sits only in the gelcoat or reaches into the structural laminate beneath. This distinction changes your entire repair approach.
Start with a clean hull. Wash the damaged area with fresh water and mild soap. Dry it completely. Then examine the surface under good light. Run your fingernail across any crack. If your nail catches in a groove, you have depth. If it slides smoothly, the damage may stay cosmetic.
Press gently around the damaged zone. Feel for soft or spongy areas. These spots indicate delamination, where layers have separated. Flex the hull slightly and watch the cracks. Do they open or close under pressure? Structural cracks respond to hull movement. Cosmetic ones stay fixed.
Take a plastic screwdriver or a coin. Tap across the damaged area and the surrounding hull. Listen carefully to each sound. A bright, consistent "tap" tells you the laminate is solid. A muffled, dead sound reveals layers that no longer bond together. Mark every dull-sounding spot with a pencil. These areas need attention.
YAMANE RYU YACHT builds boats with high-quality fiberglass, but even the best hulls suffer damage over time. Impacts, grounding, or repeated stress create hidden separation. The tapping test finds these weak zones before you start cutting.
Not every crack demands a full structural repair. Use this table to sort what you see:
Warning Sign | Likely Stress Crack (Cosmetic) | Possible Structural Crack |
|---|---|---|
Very thin, shallow line | Common | Possible |
Limited to the gel coat | Common | Unlikely |
Widens or grows over time | Less common | More likely |
Surface flexes when pressed | Unlikely | More likely |
Exposed fiberglass is visible | No | Yes |
Water enters through the crack | Unlikely | Possible |
Crack returns after repair | Possible | More likely |
Spider cracks, fine branching lines on the surface, usually stay cosmetic. Scratches that do not catch your fingernail also fall into this category. However, if you see white fibrous texture, you have exposed glass fibers. That means structural damage. Check the interior side of the hull too. Look for visible delamination or stress marks that mirror the exterior damage.
Once you identify structural damage, you must remove every weak section. Leaving any cracked or delaminated material behind guarantees a failed repair. The new laminate needs a solid foundation to bond with.
Fit an angle grinder with a 36-grit sanding disc. Wear your safety gear before you start. Cut away all cracked, soft, or weakened fiberglass. Work until you reach solid, sound laminate. You will see clean glass fibers instead of crumbling material. For large holes, use a saw to cut out the damaged section entirely. Make straight, clean cuts.
Beveling requirement: For structural patches, sand a taper at a 12:1 ratio around the damage. This creates more surface area for bonding, which is essential for strong adhesion of the new laminate.
Measure the depth of your repair area. Multiply that depth by 12 to find your taper length. Sand the edges down at this shallow angle. A wide, gradual slope gives the new layers a strong mechanical grip. Skip this step, and your patch may pop loose under stress.
Quality materials make a quality repair. Choose products designed for marine use. Your fiberglass boat deserves nothing less.
Select polyester or epoxy resin with the matching hardener. Read the manufacturer's ratio carefully. Mix only what you can use before the resin cures. For cloth, match the type to your repair goal:
Fiberglass Type | Recommended Use |
|---|---|
Chopped Strand Mat (CSM) | Promote adhesion between layers, smoothing final coat, build thickness quickly (weaker than woven) |
Woven Cloth | Provides strength to lay-up, used for cosmetic finish |
Woven Roving | Structural strength, builds thickness quickly, strong but not easy to conform to irregular shapes |
1708 Biaxial Cloth with CSM | Combination cloth offering strength, drapability, and thickness; suitable for both structure and finish |
For polyester resin, apply CSM before any cloth layer. The 1708 cloth has CSM stitched to its back, so it works as an all-in-one option.
Fiberglass dust and resin fumes harm your body. Protect yourself with proper equipment:
Gloves
Eye protection (goggles or safety glasses)
Protective clothing
Respiratory protection: dust/mist mask or N95 respirator for dust; air-purifying respirator with organic vapor cartridge for vapors
Work in a well-ventilated area. Wear long sleeves to keep fibers off your skin. These precautions keep you safe through every stage of the repair.
A clean surface tells if your repair will last or fail. Dirt, oil, wax, and salt stop resin from sticking to the fiberglass. Skipping this step creates weak spots that break under pressure. You must prepare the area with the same care you used during assessment.
Start with a thorough wash. Use fresh water and a marine-grade cleaner. Scrub the damaged zone and several inches around it. Rinse completely. Then dry the surface with a clean, lint-free cloth. Let the area air-dry for at least an hour. Any moisture trapped under your repair will cause layers to separate later.
After the first wash, wipe the area with isopropyl alcohol. Use a clean rag soaked in 70% or higher alcohol. Wipe in one direction, then switch to a crosswise pass. This removes any leftover wax, grease, or silicone. Change rags often. A dirty rag just spreads dirt on the surface. You want a completely clean base before sanding begins.
Critical rule: Never skip the alcohol wipe. Even invisible traces of oil or release agents will ruin your resin bond. A failed repair costs more time and money than proper cleaning.
Now you prepare the surface for grip. Use 80-grit sandpaper on a random orbital sander. Sand the whole repair area plus a two-inch border around it. Your goal is to remove all gelcoat and show clean fiberglass. You will see a dull, matte look when you reach the right depth. The surface should feel rough and even to your touch.
Sand in overlapping circles. Do not press hard; let the sander's weight do the work. Check your progress often. Stop when you see a consistent fiberglass texture without shiny spots. Shiny areas mean leftover gelcoat or old resin. These spots will not bond well with new material. Sand them again until the whole zone looks uniform.
After sanding, vacuum the dust. Wipe the area one more time with isopropyl alcohol. This final cleaning removes sanding dust that could hurt adhesion. Touch the surface with a clean finger. It should feel rough but not dusty. That texture gives your new resin something to hold onto.
Your repair area is ready, but the rest of your boat needs protection. Sanding dust and resin drips damage good gelcoat. Masking takes ten minutes and saves hours of cleanup later.
Apply painter's tape along the edges of your repair zone. Press the tape firmly so no gaps remain. Then cover the surrounding hull with plastic sheeting. Secure the plastic with more tape. This barrier catches overspray, dust, and accidental resin drips. For vertical surfaces, tape the plastic at the top first, then smooth it downward.
Pay special attention to areas below your repair. Gravity pulls resin and dust downward. Cover the hull beneath the work zone generously. Also protect any nearby hardware, fittings, or decals. Painter's tape alone works for small items. Use plastic for larger sections. When you finish the repair, remove all masking carefully. Pull tape back at a sharp angle to avoid lifting fresh gelcoat.
Your surface now has a clean, roughened texture ready for resin. The surrounding areas stay protected. You have completed the preparation stage correctly. This base ensures your repair bonds strongly and lasts for years.
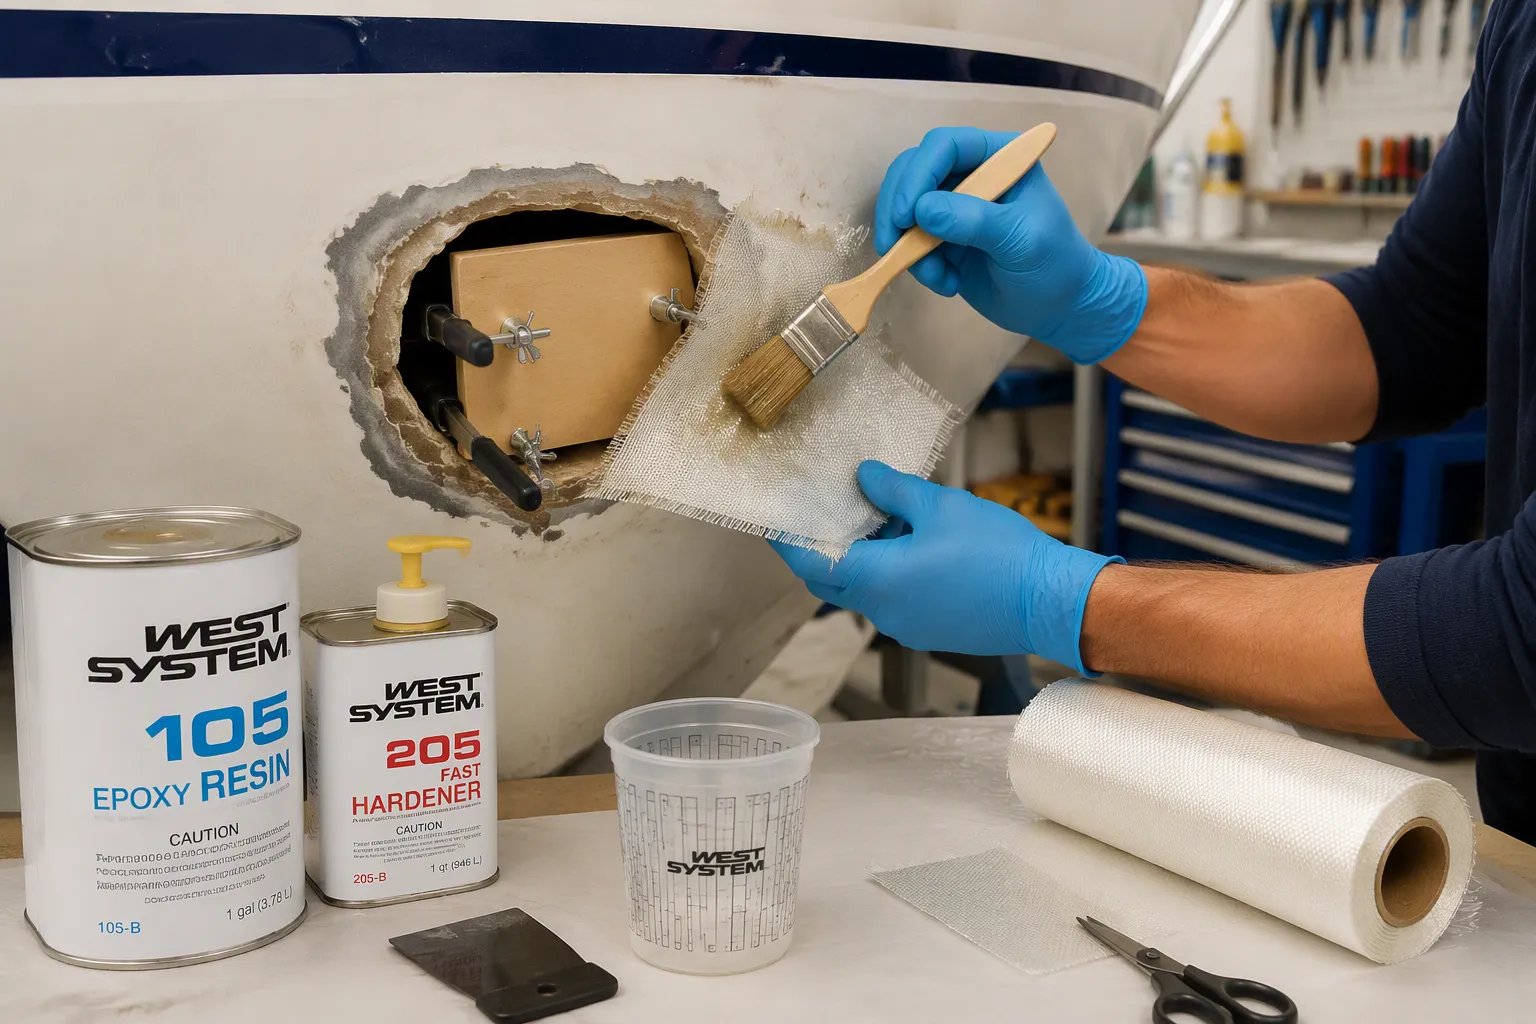
Now you move from getting ready to doing the repair. This part needs careful work. Each step builds on the one before it. If you rush or skip a step, the repair will be weak and may break under stress. With careful work, you can make your hull strong again.
For holes bigger than a few inches, you need a temporary backing board. This board gives the first fiberglass layers something to rest on. Without it, the resin drips through the hole before it hardens.
You have several choices for the backing board. Plywood works well. Cover it with plastic wrap so the resin does not stick to the board. Cardboard soaked in resin also works. Foam shaped to the hull and covered with plastic works too. Sheet metal bent to match the hull curve works. Hard plastic sheeting is another option. For the strongest repairs, use G-10 or GPO-3 materials. These are much stronger than homemade fiberglass sheet. A thickness of about 5/8 inch works best for these backing plates.
Cut the board bigger than the hole. Put it in from the inside of the hull. Pull it tight against the outer surface. Use duct tape or packing tape to hold it in place. For larger holes, use clamps or a brace that presses the board against the hull from the inside. The board must sit flat against the surrounding fiberglass. Any gap creates a weak spot in your repair.
This step builds the strength of your repair. You must follow the right order and method for a strong bond.
You need to mix the resin and hardener exactly right. For polyester resin with MEKP hardener, the ratio changes with temperature. At normal temperatures between 70 and 80 degrees Fahrenheit, use 1 to 2 percent MEKP by volume. That equals about 1 teaspoon per cup of resin. At temperatures above 87 degrees Fahrenheit, limit the hardener to 1 percent. This stops early gelling and keeps the resin workable. Avoid working below 70 degrees Fahrenheit. The curing time gets much longer in cooler conditions. The repair may not cure properly at low temperatures.
Mix only what you can use in 15 to 20 minutes. Stir slowly to avoid air bubbles. A steady color without streaks means the hardener is fully mixed in.
Cut your fiberglass patches before you mix any resin. Use a specific layering plan for the best results.
For the first setup, cut two pieces of 1708 fiberglass cloth to the exact hole size. Place the mat side of the 1708 against the backing plate. Add a layer of 1-ounce chopped strand mat (CSM) that overlaps the hole edge by 1 inch. Put these in one layer at a time. Wait about one hour for a partial cure. The material should be hard but not fully cured.
For the second layering, cut another CSM layer 2 inches bigger than the previous one. Cut a final 1708 piece 4 inches bigger than the largest layer. Put these in with the mat side toward the base. After another hour, remove the backing plate from the outside. Apply a CSM layer over the patched hole with a 1-inch overlap. Cut a larger CSM piece with a 4-inch overlap and an identical piece of finishing veil roving glass. Put both into place. Let everything cure fully.
Feather the edges of the cutout at a 12 to 1 ratio for the best bond. Each layer should be progressively larger. The first layer should be 50 millimeters larger than the hole. Each next layer should be larger until the last layer is 20 to 25 millimeters larger than the one before. Do not overbuild the repair. Too many layers create stress points and lead to cracks in the nearby laminate.
To wet out the cloth properly, pre-soak the underside of the 1708 in resin. Also wet out the surface you are laying onto. Use a resin roller, not a nap roller. A nap roller traps air and creates a mess. Calculate the wetout at 100 percent. For 2 pounds of glass, use about 28.4 fluid ounces of resin. Apply 40 percent to the base, 40 percent after laying the cloth, and 20 percent for dry spots. Pre-wet the base, lay the dry cloth, roll it dry, then add the remaining resin. Use a squeegee gently to finish.
Properly wet-out fabric becomes clear. White areas mean dry fabric. Re-wet those areas. Limit squeegeeing to avoid air bubbles. Excess epoxy looks shiny. A properly wet-out surface is evenly clear with a smooth cloth texture. Use a plastic spreader to squeegee away extra epoxy at a low, almost flat angle with even pressure. Do not create dry spots. Trim extra cloth after the epoxy reaches initial cure. Coat the surface to fill the weave before final cure.
Osmotic blisters need a different approach. You cannot simply patch them like a hole. The whole affected area needs treatment.
Grind out or sandblast every blister down to sound laminate. Remove all loose material. Sand any remaining gelcoat to remove the gloss and wax-rich surface. The hull laminate must be completely dry. Use a moisture meter. Readings should be steady above and below the waterline. Natural drying may take six months or more. Allow one to two weeks in warm, dry weather for extra water to evaporate from the hull.
Coat the areas where you removed gelcoat with unthickened epoxy. Use Clear Penetrating Epoxy Sealer to soak the laminate. Allow several days to a week for it to cure. Apply a second coat if needed. More coats may be necessary in extreme cases. Fill all holes with epoxy filler. Fair the surface smooth. Apply 4 to 6 coats of barrier coat material to the hull exterior. Apply coats wet on wet. Overcoat while the previous layer is still tacky. This allows chemical bonding and avoids sanding between coats. You can apply three or more coats per day this way.
For a specific order, apply two roller coats of High-Build Epoxy Paint. Use red for the first coat. Use blue or green for later coats. Allow 4 hours between coats. Fill all holes with epoxy filler. Let this cure overnight. Sand until the red layer is exposed. Apply three more coats of High-Build Epoxy Paint at 4 mil wet film thickness per coat. Allow several days of drying time before applying antifouling paint.
Common mistakes ruin fiberglass boat repairs. Under-scoped repairs fail because you do not grind back far enough to reach sound laminate. Choosing a shop based on price alone often results in skipped surface preparation and inferior materials. Skipping proper surface preparation causes poor adhesion. Using inferior materials means non-marine-grade resins fail under load. Not understanding the full scope of damage leads to incomplete repairs. Rushing cure times means premature sanding or loading before full cure. Not layering properly means insufficient build-up of fiberglass layers fails to restore original strength. Avoid these mistakes, and your repair will hold.
The final layer decides how your repair looks. Gelcoat gives that smooth, shiny surface you expect from a good boat. Matching the color right makes the repair almost invisible. Getting this step wrong leaves a patch that stands out every time you look at your hull.
Color matching is key for a smooth repair. A perfect match does more than look good. It keeps the fiberglass underneath protected, stopping water from getting in and causing damage. It keeps your boat looking nice and holding its value. Fixing damage early also stops small problems from turning into big, expensive ones.
Being exact matters here. Color differences of just a little may not show on a big boat surface. On a small repair area, those small differences become easy to see. Several things affect the final color you see:
When you apply it and what time of day it is
How warm it is when you apply it
Different gelcoat batches with slight color changes
How old your boat is, since factory gelcoat fades over time
Start with a colorimeter to read your boat's exact shade. Handheld models are now sold at fair prices online. Autobody shops use these tools often to match faded colors well. Spectrum Color offers OEM color lookup and gelcoat patch kits. One user matched a 1984 off-white boat using their Grady White kit.
"Spectrum Color Eye has fixed a hard guessing game for service pros when matching faded gelcoat in boat repairs. No more looking at it and hoping; this smart, small, non-damaging scanning tool with an app gives a fast and correct color match."
Tinting gelcoat from nothing is hard. Start from a close OEM mix instead. YAMANE RYU YACHT can give original color codes for their boats. This gives you a solid starting point. Then add small amounts of tint until the color matches your hull in natural light.
Regular gelcoat cures sticky when air touches it. You need a surfacing agent to stop this. Surface Seal Additive rises to the top while curing. It blocks air and makes a hard, non-sticky finish. Tack Free Wax Additive works the same way. Add 1 percent to resin or 3 to 5 percent to gelcoat for good results. Mix this into your last coat only. Earlier layers need a sticky surface for the next coat to stick.
How you apply it decides your final finish quality. Hurrying this step ruins all your careful prep work.
A brush works well for small repairs. Use a good brush made for gelcoat. Apply in smooth, even strokes. A spray gun covers bigger areas more evenly. Thin the gelcoat as the maker says before spraying. Work in a well-ventilated area either way.
Common Application Error | Consequence of Error | Correct Practice |
|---|---|---|
Rushing prep work | Weak bond between new and old gelcoat | Clean and prepare the surface well |
Filling stress cracks without grinding | Cracks will come back | Grind out the whole crack into a shallow V groove |
Not beveling edges of deep gouges | Repair has low surface area and can pop out easily | Bevel edges at a 45-degree angle |
Wrong catalyst ratio | Weak, under-cured patch or brittle, over-cured one | Mix strictly between 1 and 3 percent MEKP |
Not overfilling the repair | After shrinking and sanding, repair will be low | Slightly overfill to make up for shrinking |
Put on thin coats rather than one thick layer. Each coat should cure before you add the next. Follow the maker's cure time advice. Slightly overfill the repair area. Gelcoat shrinks as it cures. Overfilling makes up for this shrinking. After full cure, you will sand the extra down to match the nearby surface perfectly.
The final stage of sanding and polishing turns your repair into a professional-looking finish. This step takes patience and a steady hand. Rushing here undoes all the careful work you did earlier. The goal is a smooth, glossy surface that blends with the original gelcoat and stands up to the elements.
Sanding removes the high spots from your gelcoat application. It creates a uniform surface that matches the surrounding hull. You must work through a sequence of grits, each one finer than the last. Start with the least aggressive grit that gets the job done. For light oxidation, begin with 1000 to 1200 grit. For moderate oxidation, use 800 grit. For heavy oxidation or scratches, start with 600 grit. Avoid aggressive grits. Gelcoat has limited thickness, and unnecessary sanding can damage the protective layer.
Follow this progressive grit sequence for a smooth surface:
Start with 600 grit to remove highs and smooth transitions.
Move to 800 grit until the previous grit marks are gone.
Use 1000 grit to leave a uniform surface.
Finish with 1500 grit for final smoothing.
For a mirror finish, continue through 1200, 1500, then up to 2000 grit before polishing. Each grit removes the scratches from the previous step. Never skip a grit. Skipping steps leaves visible sanding marks after polishing.
Use a wet sanding technique throughout. Soak the waterproof sandpaper in water. Keep the surface wet to lubricate the abrasive and prevent heat buildup. Use light to moderate pressure with overlapping straight strokes. Avoid pressing too hard. Excessive force creates deep scratches and uneven areas that are difficult to remove. Rinse the surface and clean the sanding pads regularly to remove residue. This prevents random scratches. Replace worn abrasives when necessary.
A common mistake: skipping grits or sanding too aggressively. This damages the gelcoat and leaves deep scratches that show through the final polish. Patience with each grit pays off with a flawless finish.
Feathering the edges helps the repair blend with the surrounding gelcoat. Follow these steps:
Clean and dry the repair area to reveal all defects.
Mask off adjacent surfaces and trim.
Begin with 220 grit only if deep defects exist. Otherwise start at 320 grit.
Wet sand using a firm block on flat areas and a soft block on curves.
Sand in overlapping passes. Check under raking light until the scratch pattern is uniform.
Progress through 320, 400, 600, and 800 grit. Change direction slightly between grits.
Feather the edges by reducing pressure near the boundary of the repair.
Perform a final clean and inspection before applying gelcoat.
This careful approach ensures the edges of your repair do not create a visible ridge. The transition becomes smooth and invisible to the eye.
Wet sanding leaves a dull surface. Polishing restores the gloss and brings back the reflective finish. You need the right products and technique for this step.
Start with a marine-grade buffing compound designed for gelcoat. Better Boat Marine Boat Rubbing Compound is a heavy-duty cutting compound that removes oxidation and scratches. Apply it with a clean buffing pad on a variable-speed polisher. Work in small sections. Use moderate pressure and keep the pad moving. Follow the compound with a marine polish. Better Boat Marine Polish refines the surface to a high gloss. This two-step process of compound followed by polish gives you a mirror finish on a repaired fiberglass boat surface.
After polishing, apply a high-gloss marine wax or sealant. This final layer protects the repair from UV rays and water. It also adds depth to the shine. Apply the wax by hand or with a foam pad. Let it haze, then buff it off with a clean microfiber cloth. The result is a smooth, glossy surface that matches the rest of your hull.
Your repair now looks professional and will last for years. The combination of careful sanding, proper compound use, and final waxing completes the job.
You now understand the complete repair journey. You assessed the damage carefully. You prepared the surface with precision. You executed the structural repair with proper layering techniques. You filled imperfections with matched gelcoat. Finally, you sanded and polished to restore the original shine.
Patience and attention to detail separate professional results from amateur work. Each step builds on the previous one. Rushing any stage compromises the entire repair. Take your time. Measure twice. Work methodically.
Quality materials matter for lasting durability. Products from trusted manufacturers like YAMANE RYU YACHT enhance your repair's strength and longevity. Your fiberglass boat deserves nothing less than the best materials available.
You now have the skills to tackle this project. Head to your boat and get started. Share your success story or ask questions in the comments below.
A small crack repair takes one weekend. Structural hole repairs need several days because each resin layer requires curing time. Plan for two to three days total. Rushing the process creates weak bonds. Patience delivers a stronger, longer-lasting result.
Polyester resin cures poorly below 70 degrees Fahrenheit. Epoxy resin works in cooler conditions but takes longer. Warm the repair area with a portable heater before mixing. Work indoors when possible. Cold temperatures extend curing time significantly and may prevent proper hardening.
DIY repairs cost roughly 20 to 30 percent of professional rates. A small crack repair costs about $50 in materials. The same repair at a marina runs $300 to $500. Larger structural repairs save you even more money.
A properly executed repair lasts as long as the original hull. Surface preparation determines durability. Clean surfaces, correct resin ratios, and full curing times create permanent bonds. Skipping steps leads to premature failure. Quality materials from trusted manufacturers extend repair life.
Close inspection reveals slight differences. Color matching improves with practice and proper tools. YAMANE RYU YACHT provides original color codes for their boats. Faded gelcoat complicates matching. Accept minor variations on older hulls. Most repairs become nearly invisible after proper sanding and polishing.
Yes. Small cracks let water penetrate the gelcoat. Moisture reaches the fiberglass laminate beneath and causes delamination over time. Early repair costs less and takes less effort. Waiting turns a cosmetic issue into structural damage requiring extensive work.
Yes, but the process takes longer than standard repairs. You must sand back to bare fiberglass and apply an epoxy barrier coat. The hull needs complete drying before coating. This process may take weeks. Professional help makes sense for severe blistering across large hull areas.

