Views: 0 Author: Site Editor Publish Time: 2026-08-20 Origin: Site


A well-made fiberglass boat can easily last 30 to 50 years if you care for it correctly. Glass-reinforced plastic (GRP) resin stays strong and holds its shape over many decades. This tough material lasts much longer than wooden inner walls, electric wiring, and engines. Marine industry surveys back up this amazing strength:
Fiberglass-built Yachts (ie. Some Sportfish & Motor Yachts): 40 to 60 years and up
You can keep the hull strong over time with regular care and planned maintenance. Keeping a boat in good shape requires caring for the gelcoat, stopping leaks, and regularly servicing the hull. You protect the boat's overall safety and its future sale value when you take good care of the outer fiberglass shell.
Well-kept fiberglass boat hulls can easily last for 30 to 50 years.
Wash your boat with clean water after each trip.
Use boat-specific wax rather than regular car wax to get true protection from the sun.
Inspect the metal sacrificial anodes every three to six months for damage caused by ocean water.
Change the sacrificial anodes right away when they wear down to half of their original size.
Keep high-pressure water sprayers far away from your outer gelcoat surface.
Reseal all deck hardware regularly to prevent dangerous rot inside the wood core.
You must protect the outer gelcoat to keep your GRP hull strong. Proper surface care shields the fiberglass boat resin from sunlight, salt, and moisture intrusion.
Household soaps strip protective coatings. You should choose dedicated cleaning products for regular maintenance.
Surface / Contamination | Correct Product | Dilution / Application | Notes |
|---|---|---|---|
Hull topsides – routine salt, grime, biological film | pH-balanced marine boat soap (marine soap) | 1–2 oz per gallon; apply with soft wash mitt using two-bucket method | Safe for environment; does not strip wax or etch gel coat. Avoid household dish soap, bleach, or solvent-based cleaners. |
Salt crystals attract moisture and dull your hull. You should rinse your hull thoroughly after every outing.
Fresh water after every trip. Regular soap washes. Engine flushes. Protection on metal surfaces. Do these things consistently, and your boat will look better and last longer than boats that get sporadic attention.
Gelcoat degrades under intense sun exposure. You can evaluate surface oxidation before choosing a correction method:
Hand Test: Slide a hand over the gelcoat. Fine dust means early wear, but white chalk signals moderate harm.
Visual Assessment: Step back ten feet. A flat look shows mild fading, but thick powder means heavy damage.
Water Splash Test: Throw water on the sides. Big changes between wet and dry spots show severe fading.
Alcohol Test: Wipe isopropyl alcohol gently using a clean cloth. Surface powder comes right off when fading is light.
Restoring dull gelcoat requires a systematic approach:
Compound the gelcoat: Use a heavy-cut compound with a wool pad on a polisher. Work in 3x3 foot areas, overlapping passes. Wipe down between steps.
Polish the surface: Switch to a light cutting product (e.g., Hang Ten Cleaner Wax) with a green foam polishing pad. This removes swirl marks and improves gloss.
Seal the gelcoat: Apply a high-quality polymer sealant (e.g., Big Kahuna Polymer Sealant). This provides UV protection and seals pores against water penetration.
Automotive waxes do not offer adequate protection for GRP surfaces.
Marine waxes contain more SPF (ultraviolet protection) than automotive waxes because fiberglass boats lack a clear coat, which is present on cars and provides inherent UV resistance. This makes marine waxes essential for protecting gelcoat from sun damage.
Factor
Carnauba Wax
Polymer Sealant
Durability
2–4 weeks
3–6 months
UV Protection
Moderate
Good
Salt Resistance
Limited
Good
Heat Tolerance
Softens at ~180°F, breaks down in summer heat
Resists up to 220°F, unaffected by July sun
Application
Easy DIY, low cost
Easy DIY, longer protection
You should maintain a strict schedule to keep your gelcoat healthy year-round. Plan for detailing every four to six weeks if you own a fiberglass boat model. Apply a polymer sealant at least twice a year to prevent oxidation damage.
Yamane Ryu Yacht builds hulls with CCS/DNV-certified fiberglass and advanced manufacturing processes. These quality standards ensure superior structural integrity and long-life performance in harsh marine conditions. The resin in your fiberglass boat hull continues to cure and harden over time. This continuous curing process provides 30 to 50+ years of structural stability when you protect the core against water saturation and osmosis.
Water absorption through the gelcoat serves as the primary cause of osmotic blistering. Long-term immersion of the hull in water, especially in warmer climates, speeds up this damage. Water passes through porous areas in the fiberglass and resin structure. This liquid reacts chemically with uncured resin inside the laminate and creates high pressure. Stress cracks on the hull below the waterline also accelerate blister formation by letting seawater penetrate deeply.
You can detect early hidden water damage by using specialized inspection tools during seasonal maintenance.
The Skipper 5 moisture meter, when used in shallow depth mode, monitors moisture levels within the fiberglass layers, enabling early identification of osmosis before it becomes a severe problem.
Regular testing allows you to catch trapped liquid at initial stages and apply preventive coatings early.
You must distinguish cosmetic surface flaws from serious laminate damage to choose the right repair method.
Aspect | Cosmetic Spider Cracks | Structural Stress Cracks |
|---|---|---|
Appearance | Fine, web-like cracks; often around high-stress areas like cleats | Cracks radiating from a single point; may be accompanied by soft spots |
Depth | Shallow, only in gel coat | Deeper, affecting fiberglass laminate |
Cause | Minor hull flex or small impact | Significant stress or impact; hull deformation |
Distinguishing test | No softness; hull feels solid when pressed | Hull feels soft or flexes when pressed; indicates structural issue |
Repair approach | Can be fixed with gel coat repair alone | Requires structural repair; gel coat alone insufficient |
You can evaluate internal hull health using a light phenolic hammer or a small plastic mallet. Tap gently across the hull surface in a grid pattern and listen closely to the sound. Solid fiberglass structures produce a sharp, clear ringing tone. Delaminated areas or water-logged cores emit a dull, hollow thud.
You must select the correct resin type based on the location and depth of the damage. Epoxy resin features low shrinkage under 1% and superior moisture barrier properties, making it ideal for structural repairs below the waterline. Polyester resin experiences higher shrinkage between 5-8% and suits cosmetic surface fixes.
Epoxy can be applied over fully cured, sanded polyester resin, forming a superior bond with lower shrinkage. However, polyester resin generally cannot be applied over epoxy because it will not bond well.
You can perform a permanent structural patch by following these sequential steps:
Grind away damaged laminate around the area using a 12:1 bevel ratio taper.
Clean the prepared surface thoroughly to remove all grinding dust and oil residues.
Layer structural glass cloth starting with small pieces and moving to larger outer layers.
Apply epoxy resin evenly over each glass layer to saturate the fibers completely.
You must protect the lower hull to keep your fiberglass vessel safe and fast. Good care stops ocean growth, prevents metal breakdown, and seals out unwanted water leaks.
Special hull paints shield your boat from unwanted seaweed, hard barnacles, and tube worms. You need to pick the best paint mix for your normal cruising speeds and waters.
Hard-matrix paints form a tough shell, but ablative paints wear down over time. Safe hard-film coatings can last over 10 years without losing any surface layers.
Aspect | Hard (Non-toxic hard-film) | Ablative (Self-polishing biocidal) |
|---|---|---|
Longevity | 10+ years, non-depleting hard-film, requires occasional grooming | Frequent reapplication due to sacrificial layer erosion, typically yearly |
Environmental Impact | 100% non-toxic, biocide-free, reduces fuel consumption up to 12%, lower lifecycle emissions, reduces environmental impact nearly 10% | Toxic leaching, hazardous waste disposal, increased fuel consumption up to 10% even before fouling, up to 40% with fouling |
You must prep the outer surface carefully so new bottom paint sticks very well.
Scuff smooth fiberglass areas so the fresh coat can grab hold easily.
Clean the entire underwater section to remove grease, dirt, and hidden film spots.
Paint on an epoxy primer layer before putting down your bottom paint coat.
Add your main bottom paint layer while the undercoat epoxy feels tacky.
Read temperature gauges to confirm the air stays above 45 to 50 degrees.
Underwater metal parts quickly rust away in salty sea waters. Protective metal blocks shield prop shafts and rudders by wearing down first instead.
The local water type dictates which protective metal material you should buy.
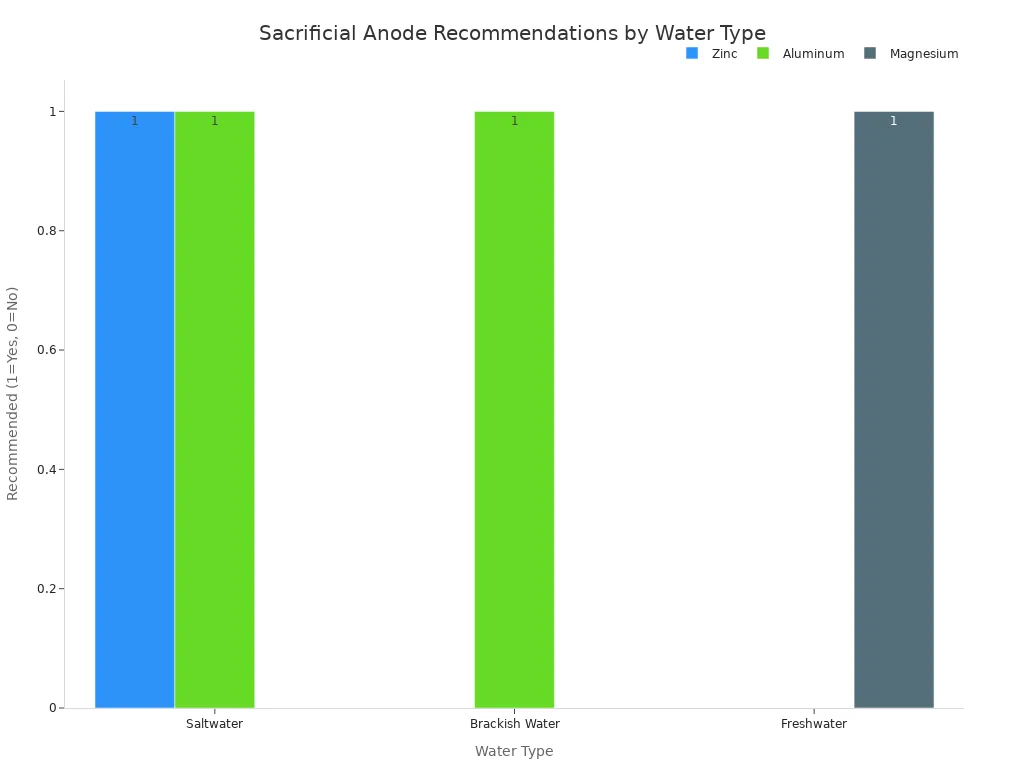
Anode Material | Saltwater | Brackish Water | Freshwater |
|---|---|---|---|
Zinc | Recommended | Not recommended | Not recommended |
Aluminum | Recommended | Recommended | Not recommended |
Magnesium | Not recommended | Not recommended | Recommended |
Check your metal blocks every three to six months in salty ocean bays. Look over freshwater anodes every six to twelve months instead. Swap out any metal block once it wears away past half its original size.
Hull valves allow seawater inside for engine cooling and let wastewater drain out.
You need to check all water valves often to keep your boat afloat.
Install heavy valves built from marine bronze alloy 85-5-5-5 or sturdy composites.
Pair matching NPS threads on hull fittings and valves to block liquid leaks.
Pick wide-base valves that bolt down tight right against your inner hull.
Rotate valve levers monthly to make sure they switch off very easily.
Scrape, grease, and check valve parts every two years for smooth working order.
Inspect prop shaft seals and cutless bearings whenever your boat leaves the water. Examine rubber seals for deep cracks, stiffness, and fast water drips. Worn bearings cause bad shaft shakes, so swap them out when you feel loose movement.
Ice forms strong inside pressure that cracks your fiberglass boat walls and breaks your indoor water pipes. You must prepare your boat carefully before winter arrives.
Empty all fresh water out of your engine, toilet tanks, and water heater before freezing cold air arrives.
Empty water tanks, heaters, and pipes by opening every tap until the pump splutters empty.
Route water past the heater so you do not waste good antifreeze inside it.
Push safe propylene glycol antifreeze liquid through all your fresh water pipes.
Turn on every sink, shower, and sprayer tap until clear pink liquid comes out.
Drain your waste tank and treat the boat toilet to stop ice damage.
Never put poisonous motor antifreeze inside your clean drinking water lines. Put new oil and filters in your engine, then flush the cooling pipes with antifreeze to shield inner parts.
Trapped damp air grows ugly mold inside your boat while it sits in storage. Keep air dampness under 55 percent inside your cabin rooms. Take out foam cushions and store them inside your house standing up so air moves around them.
Simple vents on opposite walls push fresh air across your cabin rooms. Solar fans keep air moving in daylight without needing outside wall power. You can also place salt damp absorbers in big rooms and gel packets in tiny closets.
Good bottom supports stop your outer hull from bending out of shape during dry land storage. Custom frames match your boat shape and place support pads right against inner strong walls. If you use tall metal stands, make sure the bottom center beam carries most weight on thick wood blocks.
Set every stand at a straight square angle against the hull so weight pushes right down into the soil. Connect metal stands with chains so they cannot slip apart under heavy loads.
Tough covers must stop rain while letting trapped damp air float away freely. Shrink wrap needs one air vent for every eight to ten feet of boat length. Put vents on alternating sides to make air move across your boat.
Check your whole vessel carefully before you put it back into the sea.
Check the gelcoat for tiny cracks, clear raw strainers, and turn every water valve back and forth.
Test your heavy batteries with a proper tool and tighten every wire nut firmly.
Swap out rubber water pump impellers every year to keep your engine running cool.
Check safety items, including flare dates to make sure they are less than 42 months old.
Swap out old boat trailer tires that are more than 5 or 6 years old.
Run your engine while tied to the dock before you sail away. Watch your temp gauges and check water valves for leaks. Do a short test run on the water to check your throttle, steering, and automatic bilge pumps.
You can easily extend your boat's working life past 50 years. However, common maintenance mistakes quickly destroy structural integrity. You must avoid specific daily routines that damage surface coatings and let water inside your hull.
High-pressure sprayers remove hard grime fast, but strong water streams damage your gelcoat surface.
Holding a pressure washer nozzle within 12 inches of the gel coat at high pressure can force water under the surface, damage the gel coat layer, and strip protection. Blasting the hull with too much pressure or using a harsh detergent is a surefire way to strip off that protective wax layer and sealant you worked so hard to apply.
You should always spray water from a safe distance using moderate pressure. You protect your outer sealant and keep the protective layer intact when you use soft wash mitts instead.
Harsh household cleansers quickly destroy marine surfaces and strip away protective sealants. You should avoid these common damaging chemical products:
Household dish soap: strips protective wax and accelerates oxidation.
Bleach-based cleaners: discolor gel coat and destroy wax.
Bathroom all-purpose sprays: often alkaline, may contain bleach or ammonia, damaging wax and vinyl.
Solvent-based degreasers: can cloud or craze gel coat by attacking polyester resin.
Abrasive scrub pads and steel wool: cause permanent scratches and rust stains.
Hull cleaner on painted surfaces or antifouling bottom paint: acid chemistry damages the coating.
Loose deck fittings allow rainwater to soak directly into internal sandwich core materials. Water intrusion through open screw holes causes several major problems over time:
Core rot spreads: A soft spot that is six inches across today can be two feet across next season, requiring major repair (cutting out damaged fiberglass, replacing core).
Spider cracks near transom or along stringer lines indicate stringer failure or transom core stress, potentially compromising the hull's longitudinal structure.
Cracks around loaded hardware accelerate delamination due to moisture and load cycling.
Soft spots indicate core material has absorbed water and begun to break down, leading to loss of structural rigidity.
Moisture from unsealed fittings causes balsa core rot, bond failure, and loss of rigidity in deck and cockpit sole.
You can prevent internal wood core rot by testing your deck fittings regularly:
Use a pinless or pin-type moisture meter to scan around deck hardware fittings and transom. Look for readings above 15% in wood cores and above 1–2% in fiberglass laminates. Map the wet area by taking readings in a grid pattern every six inches.
Re-bed fittings with fresh sealant, clean and apply a hydrophobic ceramic sealant to protect gelcoat and seals, and perform regular inspections. Use a dehumidifier or fan to dry out any discovered wet areas before sealing the leak source.
Your transom carries extreme weight and engine push force. Unsealed engine mounting bolts let water penetrate internal transom cores.
Check for gelcoat crazing, cracking, or movement around fittings. Sound the deck around cleats and stanchion bases for soft spots or staining indicating core damage.
Ensure all hardware is through-bolted with adequate backing plates to spread load and prevent fastener pull‑through. Re-bed any leaking fittings with proper sealant to block water intrusion into the core. Inspect lifelines and stanchion bases regularly for corrosion or loose attachment.
Structural hull cracks or transom damage can lead to catastrophic failure, especially on outboard boats where a compromised transom may cause the engine to separate from the boat. Transom soft spots are critical: a rotted core cannot safely support an outboard engine, risking catastrophic failure. You keep your vessel safe on the water by keeping all transom seals watertight.
You can keep your fiberglass boat in top shape for 30 to 50 years with regular care. Apply marine wax often, inspect all underwater parts, and track your seasonal upkeep in a notebook. Buying a quality vessel built to high standards, like a Yamane Ryu Yacht, ensures long-lasting safety and strength.
Spending $1,500 to $3,000 every year on basic upkeep keeps your boat's resale value $5,000 to $15,000 higher.
Boats that are taken care of well sell faster and get better prices. The money you save over time is usually four to six times greater than what you spent on repairs. Taking good care of your boat early protects your investment and keeps it ready to sail for decades.
A well-made fiberglass hull can easily stay strong for 30 to 50 years or longer. Performing regular boat upkeep keeps water from harming the inner core and outer gelcoat layer.
No, you must always pick specialized marine sealants or boat waxes instead. Car waxes do not contain enough light blockers to guard against damage. Marine sealants protect your gelcoat layer from harsh sun, hot weather, and salty ocean water.
You can test your hull using a dedicated moisture reader such as the Skipper 5 model. Ratings higher than 1 or 2 percent show that water has soaked inside your fiberglass. Finding liquid early lets you fix leaks before dangerous blisters form on your boat.
Spider cracks appear as tiny web patterns that only scratch the shallow outer gelcoat layer. Deep structural cracks spread out from one central point and break into inner fiberglass layers. You will spot bending parts or weak areas around these major structural cracks.
Check your metal anode blocks every three to six months while sailing in ocean water. You must swap out any protective anode block once it loses half of its original body.
Spraying a high-pressure hose closer than 12 inches pushes unwanted water deep past the gelcoat outer layer. This heavy water force strips away safe wax coats while harming your boat finish. Always hold your power washer far away from the hull.

